YuJa Instructor Guide
Getting Started with YuJa
YuJa has replaced Tegrity as the lecture capture tool used by all eleven North Dakota University System institutions. If you’ve never used Tegrity, YuJa, or similar products before, lecture capture tools enable you to use technology to record lectures or lesson content (either live or asynchronously) and make them available to students electronically. YuJa can provide more time in class to focus on engaging activities like problem solving or experimentation and can allow students to review content covered previously. YuJa comes with closed captioning which aids learning. It can also include documents and links to sources. YuJa recordings are editable.
This document will provide you with an overview of how to use YuJa through Blackboard’s interface. If you had Tegrity recordings migrated to YuJa, this document will explain how to find them.
YuJa can be accessed in one of these three ways:
-
Blackboard: You can either add YuJa as a content item or create a tool link to YuJa in your navigation bar.
Important: To ensure proper account synchronization, use Blackboard the first time you log into YuJa.
-
YuJa’s website: Navigate to YuJa’s website using this syntax: InstitutionName.yuja.com and log in using your NDUS credentials.
-
YuJa’s mobile app.
Create a Tool Link in Blackboard for YuJa Recordings
There are a number of ways you can add a YuJa recording to your Blackboard course. We’ll start by creating a tool link. Additional options will be covered later. You can create a tool link (course menu) that will go directly to YuJa recordings by following these steps:
- Choose the Add Menu Item icon and Select Tool Link.
- Name the tool link Tools, check Available to Users
-
Choose Tools Area as the tool type.

Create a YuJa Recording via Blackboard
Now that you’ve added the Tool Link, click it to log into YuJa.
Choose Submit. When you add YuJa as a content item in Blackboard, you’ll get an email message saying that you’ve successfully created a course group.
In the content area of your course, click the YuJa link you just created. This brings you to your YuJa account online where you will see something similar to this:

The first time you click the Create Recording link, you’ll be prompted to download the YuJa Software Station capture application. Click Download as shown below and follow all prompts to download. If you already have the software on your desktop, you will just click START.

In Chrome, when the software has finished downloading, this button appears in the lower left corner. Click it to install YuJa Software Station software (or go to your downloads folder and double-click the YuJa-Software-Station.exe file to launch the installation wizard.)

During the Install Shield Wizard, you will be prompted to accept the terms of agreement. Then, follow all prompts to install.
After installation, you will be prompted to log into YuJa using single sign on:

And again, to validate your NDUS credentials:

Once you complete this sign-on process, you won’t have to repeat it as long as you have not signed out.
Now you will be ready to record! In the future, when you click Create Recording, this is the dialog box that will appear.

About the YuJa Software Station
-
Title: Before you start recording, indicate the recording’s title. Consider using a naming convention such as COURSE NAME | UNIT | LECTURE TOPIC or something similar that will make it easy to sort and find your recordings later. You can rename your recordings too.
-
Description: Indicate what your recording is about. This can include a brief description or objectives. You can edit the description later.
-
My Media Collection/Default Collection and Media Channel Selection:
- By default, your recording will be stored in the default media collection folder. You can create folders to organize your recordings.
- Click the Media Channel button to select a course to publish your video.

4. Video Source: This displays the video currently feeding into the recording. See #6 for more information.
5. Screen: This displays the current screen being recorded.
6. Video: This button provides for alternative video options, or to turn video off completely.
7. Audio: This button provides for alternative audio input options.
8. Screen: This button provides for alternative content display options. For example, you can choose from single or duo displays, custom display, or capture a selected area.
9. Live: By default, live is set to no. Turn on (slide button to the right) for live streaming.
10. Profile: Profile refers to a collection of settings. You can save your recording settings as a profile for easy setup in the future. For example, you may have a profile for recording from your desktop and another profile when recording in a specific classroom.
11. Click Start to begin recording
Additional Options
Help – located in the upper right corner of your screen, clicking this menu will bring you to https://support.yuja.com.
Settings – (shown right) this menu will display the settings dialog box where additional features such as hot keys and mor are available.

Recording
Before you record, have your document, your PowerPoint slide show, or whatever you are choosing to record ready to display on your computer screen. Choose Start to begin recording. A countdown from 3 will display and then you will be live.
When finished, look for YuJa’s Software Caption controls in the bottom right corner:

When you click stop, you’ll be prompted to save or delete the recording:

Allow the Recording to Process
Depending on the length of your recording, it may take a few minutes to process. DO NOT close your browser or disconnect from the Internet until the recording has fully rendered. You will receive an email confirmation when the recording is available. If you should disconnect, YuJa will continue the upload once you reconnect. You will receive an additional email message when the closed captioning has rendered.
Where to Find Recording
If you did not specify a folder or media channel in which to place the recording, you’ll find the recording in the My Media folder as shown in figure 1 of this handout. When you click My Media, you’ll see a folder called Default Collection which is the default location for all recordings. IMPORTANT: Even though you might have launched YuJa from within a Blackboard course, that recording still needs to be published to the course before students can see it. If you did not specify a media channel to publish the recording in step 3, continue reading to learn how to do that.
Edit Recording Title and Description
If you forget to give the recording a title and a description, the default title will be “My Event” followed by the date. The description field will be blank. To change the title and/or add a description, hover the mouse over the recording tile and choose More:


Give the recording a new title and if desired, a description. If you’ve uploaded documents to YuJa, you can add them here. (This is covered later in this handout.) You can also add tags. Choose Save General and then Close.
Publishing Your Recording with the Course
If you did not specify a location to store the recording when you first created it, that recording will be available in your Default Collection. Much like students cannot see files stored in Blackboard’s Content Collection, recordings will not be available unless you provide a link to them or publish them to your course.
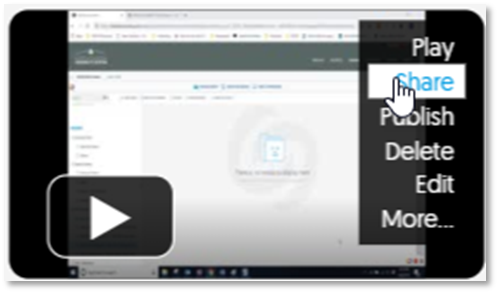
To publish the recording with your class, hover your mouse over the thumbnail image of the video and select Publish.

In the Publish dialog box, browse all channels and then select your course. Choose the Select button to finish.
You can also drag the recording from the Default Collection to the class channel too.
Manage Media
Following are the locations where you can store recordings and other media:
Personal
Shared
My Media: this is where your Default Collection is located. You can create additional folders here.
Shared with me: in this location, you can view folders and videos others have shared with you.
Enterprise Tube: this is a public location for your campus. It’s the only media channel accessible without logging into YuJa. The Enterprise Tube can only be managed by YuJa administrators.
Featured videos: These are videos which your campus might wish to showcase.
Library: Enterprise videos can be organized into folders such as departments, events, or audience.
Shared Folders: This link contains shared folders. By default, you will see the Featured Videos and Library from the Enterprise collection along with the folders Shared – All Instructors and Shared – All Students.
All Channels: lists all the channels you can publish to.
Sharing Individual Recordings and Folders
Earlier you learned how to share a recording with your class. You can also share recordings with other people, and you can share folders containing media as well.
Share Individual Recordings
To share an individual recording, hover your mouse over the right edge of the recording thumbnail and choose Share:
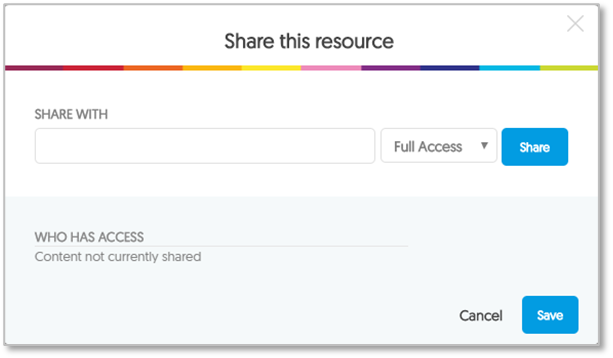
The Share This Resource dialog box appears. Click inside the Share With field to view a drop-down list of names to select. You will see a list of users who have a YuJa account for your specific institution. Click inside the field again to add more names. You can specify whether these individuals have:
- Full Access – The user has all rights including the ability to delete the media.
- Edit Access – Media may be viewed or edited, but not deleted.
- Read Only access – Media can be viewed but not changed.
The Who Has Access field displays the individuals who currently have access and you can change their access rights. Choose Save when finished.
Share Folders
Just like you share recordings, you can share folders that contain videos, for example, with a teaching assistant or colleagues. Start by navigating to the Manage Media link on YuJa’s Software Station. Select the folder. From the menu at the top select More Actions and choose Share Folder:

As you did with sharing a recording, click inside the Share With field and select the names you wish to share the folder with.
Step 1: Add Documents and Media to Recordings
To include a document or other media with your recording, you must first add the document/media to YuJa, then link it to the recording.
Navigate to the media channel and folder where your recording resides. Choose Upload.

Select Documents (or choose other media or link).
Click browse.

Give your document a title and a description.
Additional Options
Publish: Clicking Publish produces a dialog box where you can elect to make the document available to other channels:
Add tags: You can add tags to make the document more searchable in YuJa.

When finished, choose Confirm.
Step 2: Link a Document/Media to the Recording
Once you have added a document/media, you can link it to a recording. Select the recording. Hover your mouse over the recording to produce the menu items:

Click More to bring up the following options:

Click Add Document then select the document you just uploaded to YuJa.
Click Save General to finish and choose Close.
When users click the video to play it, beneath the video they will see resources such as the video’s description, a button for Transcript, and a link for Documents. Clicking the Documents link displays a link to the attached document. Clicking on the link downloads it to their computer.

Important: YuJa automatically captures your voice and converts it into text for closed captioning. Users see this when clicking the Transcript link. After recording a video, you should check to make sure your recording was transcribed accurately. This is covered next.
Editing the Closed Captioning Transcript
When you record a YuJa video, your voice will automatically be transcribed to text. Be prepared to make some edits as there is no closed captioning tool that is perfect. Just like you received an email notification of the recording once it’s rendered, you’ll also be notified by email once the transcript for closed captioning is ready.
There are a couple of ways to edit the closed captioning. One way is to hover over the selected video and choose More…, then choose Accessibility. Here you can download, edit, and then reupload the captioning, upload a caption from a service, and edit the transcript of each video.


Another way to edit the closed captioning is through the YuJa editor:
To view and edit the closed captioning transcript, hover your mouse over the right thumbnail of your video and
choose Edit:

The YuJa Video Editor appears (shown below). Click the “CC” button shown in figure 8 below to display the Captions editor:

You can make edits to the captioned script directly in the Captions editor as well as add captions.
Choose the Index button located to the right of the CC button to view a video thumbnail and timestamp alongside the corresponding caption. You’ll also have the option to select either normal or bolded text, and you can single or double indent.
Remember to Save changes.
How to Find Tegrity Recordings Migrated to YuJa
Click Manage Media, My Media. Instructors who had Tegrity recordings migrated to YuJa will find a folder labeled with their name. To publish those converted recordings into a course folder, expand the folder to view the list of recordings, then drag the recording to the course listed under All Channels.

When the instructor opens the course folders above, they will see the video contents (with the GUID supplemented by the Recording Name) associated with the course.

Additional Ways to Add Links to YuJa Recordings in Blackboard
Earlier you learned how to add a Tool Link to YuJa recordings. You can also add YuJa recordings through:
- Build Content and selecting YuJa Media Chooser
- Blackboard Mashup tool
- Weblink
- HTML embed code
Build Content Using YuJa Media Chooser
When selecting the YuJa Media Chooser (located in the Build Content menu) you will be brought to a screen where you can select your video. The video then appears as a link in the course.
This method is also how you would add a YuJa video quiz and take advantage of the Blackboard/YuJa grades integration.

Mashup Tool
In the Text Editor window, one option you will see is Mashups. Click Mashups and then choose YuJa Media Chooser to insert a video:

Scroll down to locate your collection of YuJa videos and quizzes:

Provide a Direct Link to Your YuJa Video
- Hover over the video thumbnail, then choose More.
- Choose Links:

- Then select the code beneath Direct Link and press Ctrl+C on your keyboard to copy it. Close the dialog box.
- Navigate back to your course, select Build Content and choose Item.
- In the toolbar of the content box look for the HTML button and click it:
- On your course site, choose Build Content, Web Link, paste the YuJa direct link.
Embed Your YuJa Video
If you’re familiar with how to use YouTube’s embed code to Similar to a YouTube video you can display your YuJa video using an embed code. Log into your YuJa account via the Tools Link you added earlier.
- Hover over the video thumbnail, then choose More.
- Choose Links:

3. Then select the code beneath Embed this Video and press Ctrl+C on your keyboard to copy it. Close the dialog box.
4. Navigate back to your course, select Build Content and choose Item.
5. In the toolbar of the content box look for the HTML button and click it:

6. Paste the code you just copied (Ctrl+V) and click update.
7. Choose Submit.
Additional YuJa Help Resources
Check these resources for more information.
YuJa Support Site
YuJa Video Tutorials
YuJa YouTube Channel
Have additional questions or technical issues?
Don't hesitate to contact VCSU Service Desk by sending a chat or creating a ticket here: https://onestop.vcsu.edu/support/tickets/new
Or send us an email at tsticket@vcsu.edu.